The newly-released Linux distribution system, Ubuntu 22.04 LTS (Jammy Jellyfish), is now officially integrated with a New Active Directory features. Canonical is pleased to anounce the new Active Directory Integration with Ubuntu 22.04 LTS on May 17, 2022 which is available on-demand. According to the OS vendor, Linux Active Directory integration is one of the most popular and more requested topics either in the community forums or Canonical cliens.
ADsys is Completedly Different with SSSD
SSSD is an upstream Active Directory service which manages access to remote directory services. It authentication mechanisms not only for Active Directory. Moroever, ADsys is a new Ubuntu specific Active Directory Client that extends SSSD functionalities by adding some of the following features:
* Native Group Policy Object which support for both machine and user policies. It targeting dconf settings on the client machine sides.
* Privilege Management that allow the possibility to grant or revoke superuser privileges for the default local user, and Active Directory users and groups.
* Execute with Custom Scripts that provide the possibility to schedule shell scripts to be executed at startup, shutdown, login and logout.
* Available Admx and adml administrative templates for all supported versions of Ubuntu-based distros.
The following release version of Ubuntu Desktop is supported ADsys:
* Ubuntu 20.04.2+ LTS (Focal Fossa)
* Ubuntu 22.04 LTS (Jammy Jellyfish)
* Future Desktop Ubuntu Releases.
ADsys also work on the Ubuntu Server
ADsys (Active Directory System) can also running on the Ubuntu Server. For example, if you have running cloud VPS with Ubuntu 22.04 LTS VMs images you can install this package. However, “gsettings” is not available by default on the Ubuntu Server edition. Well, you can use the ADsys functionalities after you have installing the package.
Landscape as a Cloud Management System and Monitoring Solution for Ubuntu
There is available Landscape as the cloud management system and monitoring solution which can work perfectly on both Ubuntu Desktop and Server Edition. Please note that Landscape is not an AD replacement, however it just compliment with adding Linux specific functionalities like the ability to configuring the mirrors. Ubuntu ADsys along with all future Ubuntu enterprise products are trying to extend its compability with another popular enterprise management and compliance tools.
It will allow IT system administrator (SysAdmin) to re-use the same knowledge, tools or software and processes they have developed for Windows to manage their Ubuntu machine.
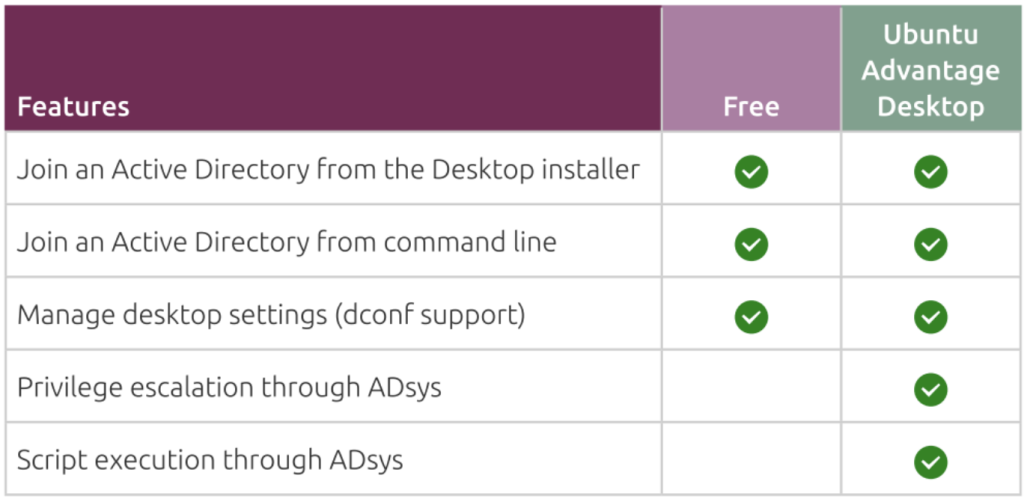
For the privilege escalation and remote script execution, here’s is the way if you want to enable privilege escalation and remote script execution. Basically the ADsys GPO have a function that can be used free of charge by everyone which using Ubuntu machine. The client only need an Ubuntu Advantage Desktop token to run the privilege escalation and remote script execution functiontionalities.
There are some differences from the free tier and paid tier in the following chart:
Powershell Scripts Can Working in ADsys
The Powershell scripts can be executed is the related snap package is installed on the current Ubuntu machine. Considering that ADsys remote script execution feature is provide supports for all binaries that can be executed on Ubuntu. Well, you can easily install Powershell in Ubuntu machine using the snap install Powershell command.
However, Samba or Winbind is not yet supported, since ADsys is require SSSD and Canonical have no plans to add Samba or Winbin support. But, you can reference files in the directory (e.g. wallpapers) if your Ubuntu machine have samba shares attached. While the scripts execution feature requires you to make the scripts available in your Active Directory sysvol samba share.
ADsys have a feature of privileges escalation which allow you to disable local administrators as well as add or remove sudo privileges to Active Directory both for users and groups. That’s why sudo permissions is not allowed to restrict access into the specific a set of cli commands. Moroever, in order to make ADsys work seamlessly, SSSD is required since the node system shouldbe joined with the domain names.
The node system should be joined as well via the SSSD before enabling ADsys. We can join it later from specific machine, either it using initial installer flow or at any time during the node system is running. There is also shell script login which is become the best way to map file sharings and printers via login shell script.
SSSD and ADsys become currently clients which is targeted at Active Directory Domain Service, but it does’nt support Azure Active Directory (AD). While the Azure AD authentication is a very requested feature and become a future Ubuntu product roadmap. There is also no schema changes that requiered when using a New ADsys features. In addition, users also need to import the relevant administrative template into their distribution.
There is a command which can utilize by ADsys client to automatically download the proper administrative templates. Or in you can use another way to find it in the relevant Github project page. User can use installer flow which is available with graphical user interface (GUI) and it guide you into the Active Directory configuration steps. The node system at Ubuntu can also be joined into the domain name after the installation proccess is finished, but there is no User Interface or UI at this moment.
Although Roaming profiles is not yet supported at this moment, but Canonical is currently still consider to include Roaming profiles closely into future Ubuntu product roadmap. This product backlog added will be closely based into the Ubuntu customer interest in the future. There are also another features like map a unified home directory which can be done via shell script login. In addition, ADsys allow the client to set GPOs which enfore default or custom dconf settings on the client. Users can also disable auto USB mount after their installing Administrative Profiles which included in its tools, just doing it by setting the desktop key or media handling or change automount value from true to false.


